Using Bluetooth Low Energy from JavaScript on mbed
This post was originally published on Mbed Developer Blog.
Some time ago we blogged about adding JavaScript support for mbed OS 5 through the JerryScript VM. In this blog post we’ll show how you can use the Bluetooth Low Energy API from a JavaScript application. Writing your BLE application in JavaScript on mbed means enjoying the flexibility of a dynamic language while leveraging the well tested, widely used and battery friendly mbed BLE API.
In this article we’ll write a small program in JavaScript that allows us to control an LED on our development board from a smartphone.
Prerequisites
You will need a development board capable of running mbed OS 5 with at least 64K of RAM, like the Nordic Semiconductors nRF52-DK. If your board does not have an on-board BLE chip you’ll also need a Bluetooth shield.
In addition you’ll need the following software:
- All software requirements listed in this blog post.
- A recent version of node.js.
- gulp.
Getting started
Open a terminal window and run:
$ git clone https://github.com/ARMmbed/mbed-js-ble-example
$ cd mbed-js-ble-example
$ npm install
This will clone the example program, and install all dependencies (mbed OS 5, JerryScript and the JS BLE wrapper).
If you are using the IDB05A1 Bluetooth shield, open mbed-js-ble-example/build/jerryscript/targets/mbedos5/mbed_app.json and replace the content with:
{
        "*": {
            "target.features_add": ["BLE"],
            "target.extra_labels_add": ["ST_BLUENRG"],
            "target.macros_add": ["IDB0XA1_D13_PATCH"]
        }
    }
}
If you’re using an ST NUCLEO board (like the F401RE or F411RE), remove the line that starts with target.macros_add.
Now we can build our program. Run (change NRF52_DK to your target name):
$ gulp --target=NRF52_DK
The binary will be in build/out/TARGETNAME/ and will be named mbedos5.hex or mbedos5.bin (depending on your target; see the last line of the build output). Use drag-and-drop programming to flash the program on your board.
Interacting with the device
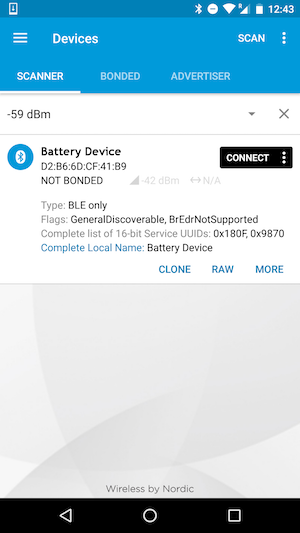
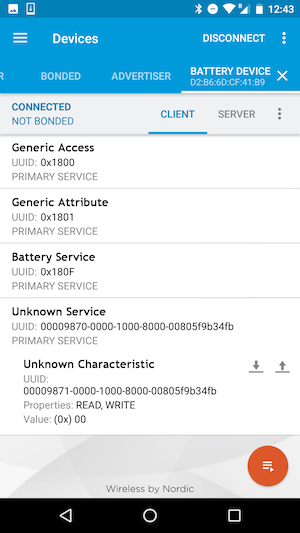
After flashing the device will be broadcasting under the name Battery Device with two services: a battery service and an LED control service. You can use a Bluetooth monitor like nRF Connect to view the device and interact with its characteristics.


Scanning for the device, and then seeing the device services after connecting using nRF Connect for Android.
To toggle the LED write 00 or 01 as a byte array to characteristic 9871.
JavaScript API
To change the program open main.js. This file has access to all BLE functions.
var controlLed = DigitalOut(LED1);		// LED controllable through BLE

// global BLE object
var ble = BLEDevice();

// Define a new service and a characteristic.
// Characteristic takes in: char UUID (16 bit only for now), array of permissable actions (read, write or notify), and a packet size (in this case 1 byte).
var batteryChar = BLECharacteristic('2a19', ['read', 'notify'], 1);
// Service takes in: service UUID (16 bit only), and an array of characteristics
var batteryService = BLEService('180f', [batteryChar]);
var batteryLevel = 100;

// If a characteristic has 'write' enabled you can register an 'onUpdate' callback, which will fire when the char is being written over BLE
var ledChar = BLECharacteristic('9871', ['read', 'write'], 1);
ledChar.onUpdate(function(newValue) {
    // newValue is an array of bytes. You can also get the value through 'ledChar.read()'
    print('Updated ledChar, newValue is ' + (newValue[0] ? 'on' : 'off'));
    // LED 0/1 are switched on the nRF52-DK. Might need to change for your platform.
    controlLed.write(newValue[0] ? 0 : 1);
});
var ledService = BLEService('9870', [ ledChar ]);

print('created variables');

ble.onConnection(function() {
    print('GATT connected');
});

ble.onDisconnection(function() {
    print('GATT disconnected');

    ble.startAdvertising();
});

ble.ready(function() {
    print('ble stack ready');
    ble.addServices([
        batteryService,
        ledService
    ]);
    // startAdvertising takes a third argument as well (interval), default value is 1000 (ms).
    ble.startAdvertising('Battery Device', [
        batteryService.getUUID(),
        ledService.getUUID()
    ]);

    // writing to a characteristic by sending a byte array
    ledChar.write([ controlLed.read() ? 0 : 1 ]);
});

// We can schedule code by using normal JS constructs like setInterval and setTimeout
setInterval(function() {
    blink();

    // if we're connected we'll update the value of the battery characteristic
    if (ble.isConnected()) {
        batteryChar.write([batteryLevel]);

        batteryLevel--;
        if (batteryLevel <= 0) {
            batteryLevel = 100;
        }
    }
}, 1000);

print('main.js has finished executing.');
Note: To see debug messages (print calls), connect a serial monitor to the device and listen on baud rate 115200.
From here it’s easy to use other peripherals, load drivers and create new services and characteristics. If you’re interested in porting new peripheral drivers, see: Using mbed libraries with JerryScript.
Conclusion
By porting the mbed BLE API for JavaScript we can combine a well-tested and performant BLE stack and run it in a dynamic virtual machine runtime. This allows for quicker prototyping, fewer errors, and writing code without having to deal with ISRs or context switching - while still maintaining proper battery life, and the ability to run your code on a low-cost microcontroller. Combined with Web Bluetooth, you can write your embedded client and application in a single language.
When porting this library we’ve also experimented with ways to distribute mbed libraries and their JS wrappers through npm - rather than through mbed CLI - and we’ll continue this work for the rest of the year. We also presented our work on JavaScript on mbed during JSConf.asia 2016 last week, and you can find the video here.
-
Jan Jongboom is Developer Evangelist IoT at ARM and has warm feelings for both C++ and JavaScript.