Introducing the Mbed Simulator
This post was originally published on Mbed Developer Blog.
Try the simulator directly in the browser: Open Simulator
While we have worked hard to improve embedded development tooling in Mbed (e.g. via the Online Compiler), the development for microcontrollers is still very similar to how it was in the 90s. Compilation is slow, and flashing is even slower. When fixing a bug, you need to get the device into the exact state as it was in before encountering the bug. This makes for a very slow feedback loop, which hinders productivity and often pulls you out of the zone.
To make this feedback loop much faster, we’re releasing an alpha version of the Mbed Simulator. The simulator allows you to run your Mbed OS 5 applications directly on your computer, so that you can quickly test and verify applications without flashing them on a real board. This is a valuable learning tool, as you quickly learn how Mbed works. It is also very useful for developing complex applications. Within Arm, we have been using the simulator for work on mbed-http, the Mbed LoRaWAN stack and uTensor.
Note: The Mbed Simulator is part of Mbed Labs. The Mbed Labs projects showcase interesting side projects developed by Mbed engineers. However, these projects are not actively supported by Arm, and may be added, removed or break at any time.
Online Simulator
The simulator comes in two flavours: an online version, which runs completely in your browser, and an offline version, which works for any Mbed OS 5 project. The easiest way to get started is to:
Open the online Mbed Simulator
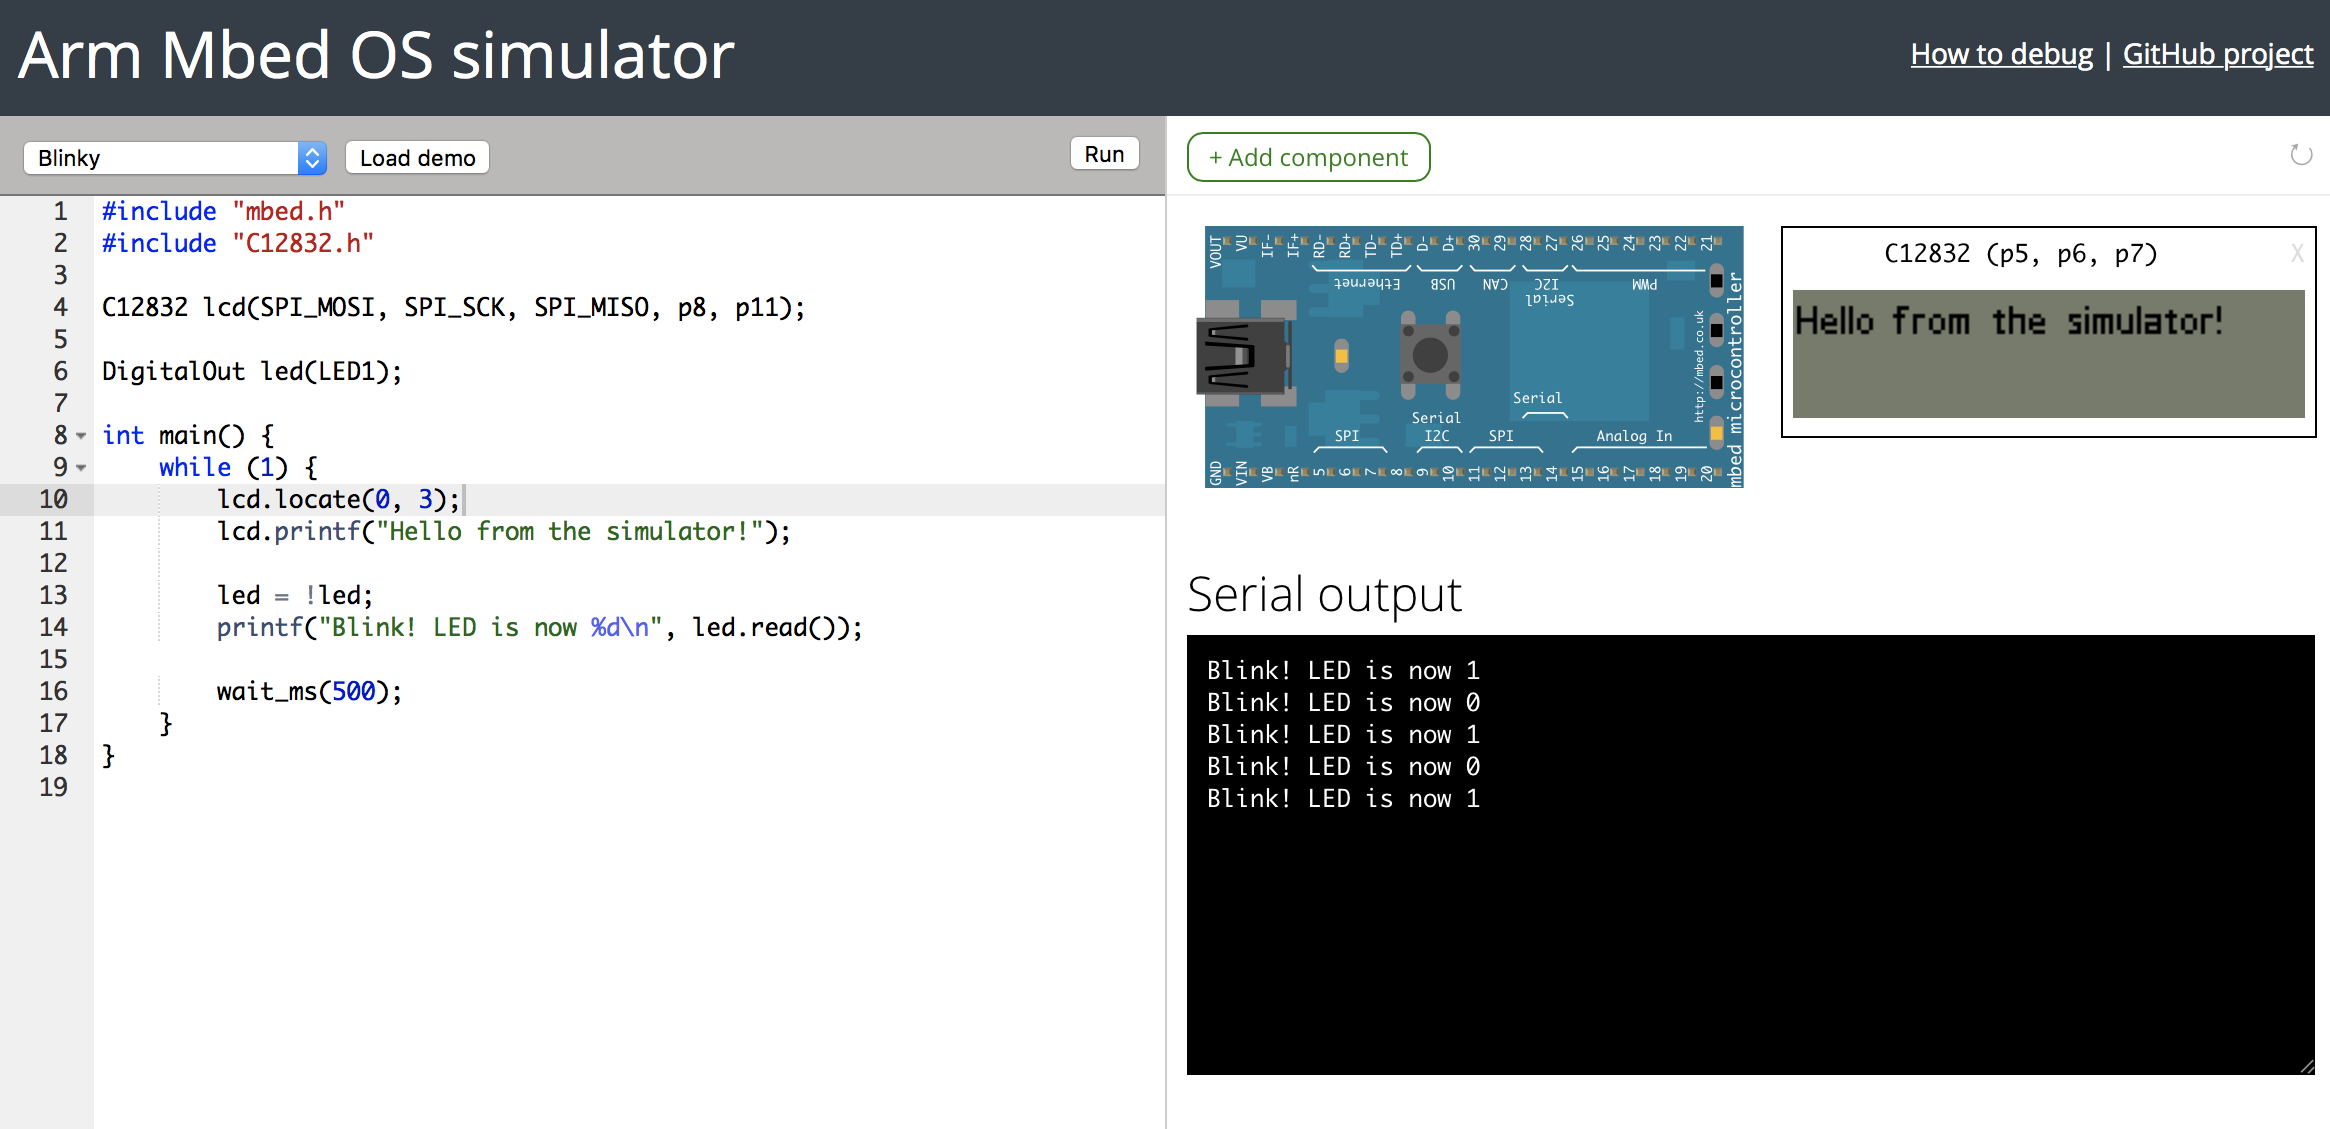
The simulator shows the code editor on the left. You can change the code here, and click Compile to run it in the simulator. There is a wide range of demo’ available, from peripheral demos (like the popular C12832 LCD display) to network demos. Yes, that’s right; you can use the full Mbed networking stack directly from the simulator. Select the demo in the dropdown menu and click Load. The demo loads automatically.
You can also add new components. For example, to blink an external LED:
- Load ‘Blinky’.
- Click Add component.
- Select the Red LED.
- Select p5 as the pin.
- In the code, change
LED1top5. - Click Compile.
- Now the external LED blinks, instead of the internal LED.
You can also share your code with others by sharing the URL of your compiled application. When someone opens the URL, it loads the application you previously created.
Offline
You can also run the simulator offline on any Mbed OS 5 project. This allows you to integrate the simulator into your development workflow.
To use the simulator offline, make sure you have:
- Mbed CLI.
- The Emscripten SDK.
- Node.js 8 or higher.
Then open a terminal window, navigate to an Mbed OS 5 project and run:
# installs the simulator
$ npm install mbed-simulator -g

# run the current project
$ mbed-simulator .
This cross-compiles the current application and opens a browser running the application.
Here is a demo running both Blinky and uTensor in the simulator:

You can can pass a wide variety of options to the simulator - such as C++11 support, preloading file systems, or loading components - and these can be found in the documentation.
How it works
Unlike Fast Models, the Mbed Simulator is not fully simulating a Cortex-M device. Instead, it cross-compiles Mbed OS 5 using Emscripten. Emscripten is an LLVM to JavaScript compiler, which takes in a complex C++ project and spits out something that can be run in a web environment. Then, when something should happen with the physical board (for example, pull a pin high), the call is intercepted, and instead of toggling a register, we can toggle a graphical element on the display. This is done by adding a new target to Mbed OS.
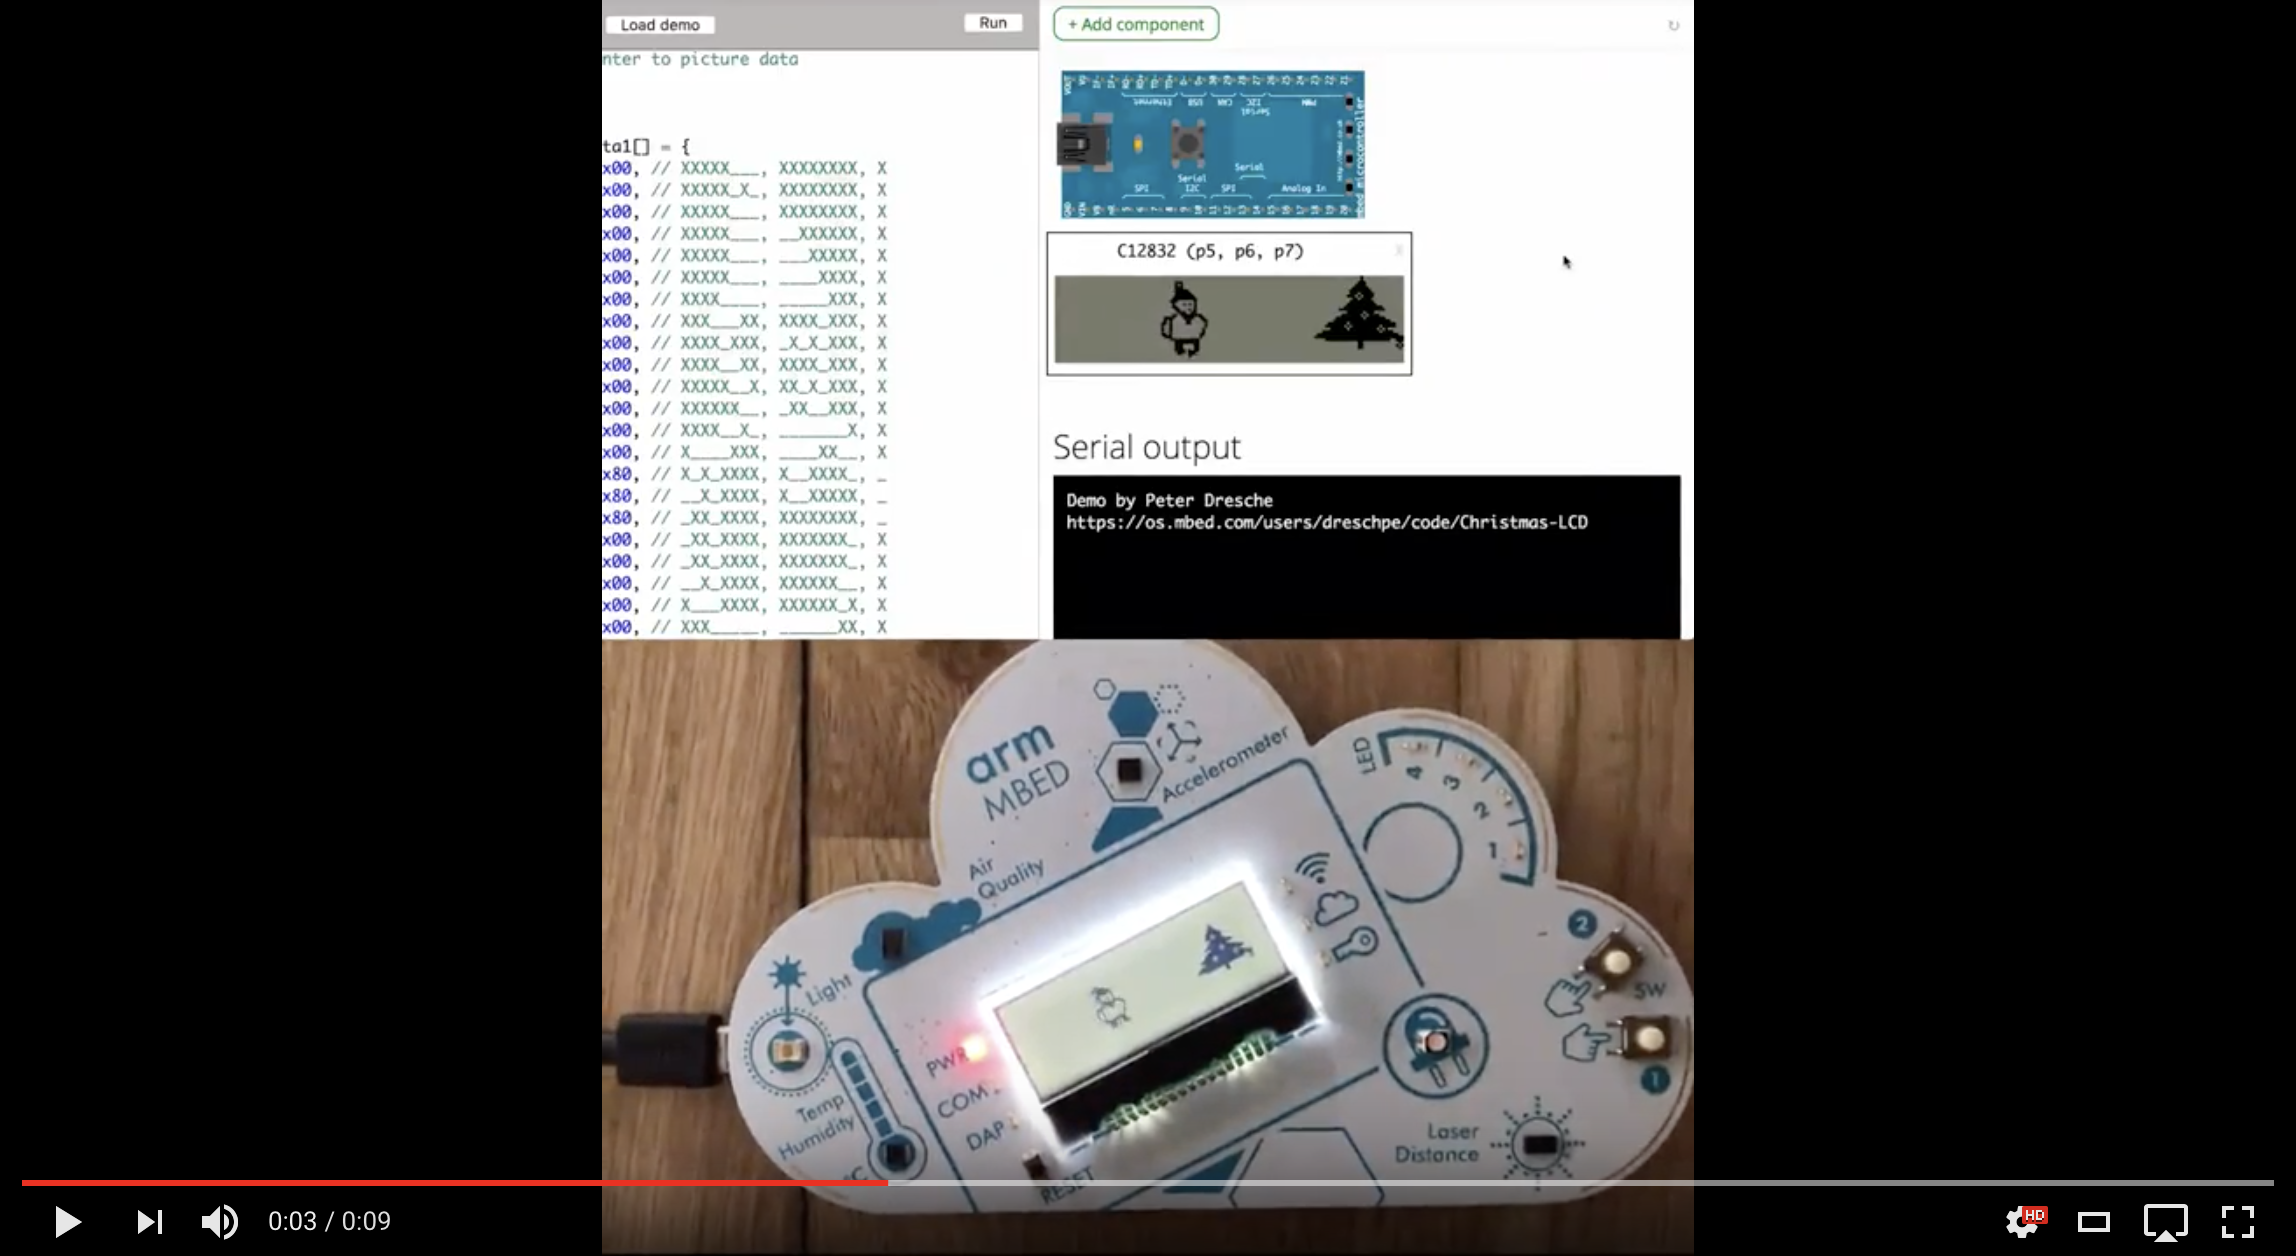
A similar approach is taken for components. The moment that the actual communication should take place, we intercept the call and send the data to the browser. For example, with an LCD display, we intercept when the frame buffer is flushed and dump the image to a canvas instead. Everything else in the driver, from font rendering to the API, remains exactly the same. Here you can see both a real device and the simulator running the same animation:
Writing new components is easy and can mostly be done in JavaScript. See the docs.
Networking
A similar approach is taken for networking. A fake network interface is added while compiling for the simulator. When this interface opens a TCP or UDP socket, this is dispatched to a Node.js daemon (because you cannot open random sockets from the browser), and send/recv actions on this socket are then piped through. This approach allows you to run almost any Mbed OS networking example directly in the simulator, including HTTP, HTTPS (including TLS handshakes), CoAP and NTP examples.
To get the LoRaWAN stack to run in the simulator, the simulator uses a fake LoRa radio driver. When the LoRaWAN stack wants to drive the radio, the fake radio intercepts the package. This is low level enough that we only get the encrypted packet, data rate and frequency. This data is then delivered directly to a LoRaWAN network server, which has no idea that this is not a real LoRaWAN device. This approach works well, as two-way data, acknowledgements and OTAA joins all function.
Limitations
Currently, the simulator has the following limitations:
- Busy-looping (
while (1) {}) without callingwaitanywhere will make the browser hang. Make sure you usewait()when you want to pause. - Not at all cycle accurate. The application runs as fast as possible.
- Much more memory available. No limitations are in place for stack and heap size.
- Interrupts are faked. The browser has no concept of interrupts, so interrupts don’t take priority over the main thread.
- No RTOS. This is a single-threaded environment. You can use
mbed-eventsto make it a bit easier to deal with complex environments, but you can’t spin up multiple threads.
Recap
The alpha version of the Mbed Simulator is a great step in the right direction. It massively shortens the feedback loop when developing applications, and because it includes networking, you can use the simulator for more than just toying around. One additional use is that it gives non-embedded developers access to simulated devices for easy development. In preparation for an event, we gave our web developer access to a fake LoRaWAN device to verify that the back-end handling of LoRa events was correct, and that worked well.
We’re currently looking at ways to integrate the simulator into our other tools, perhaps in the documentation, getting started guides, or the Online Compiler. For now we’d love developers to try this out first. If you have any feedback, please raise a ticket on the GitHub project! Also keep an eye on the Mbed blog, as we’ll be publishing an article about the LoRaWAN simulator in the next few weeks.
P.S. we realize that this is not the only approach to simulating devices, and we’re also working on Fast Model support for Mbed OS.
-
Jan Jongboom is Developer Evangelist IoT at Arm, and the author of the Mbed Simulator. He’s always trying to force more JavaScript upon embedded developers.